In this tutorial we will create two buttons and on pressing one of the button, TextView displays the text as which button is pressed.
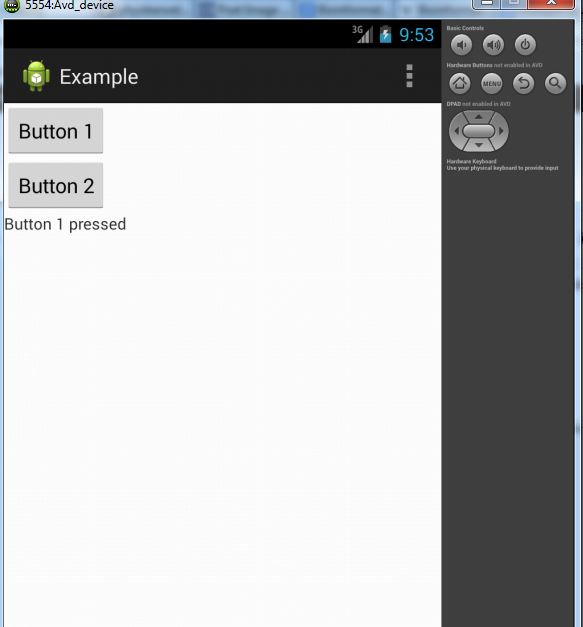
Output will be as:
Xml file: res---layout
First, Layouts are used to define how your views(i.e Buttons, TextViews, etc) will be positioned on the screen. For these, different layouts are used such as LinearLayout, RelativeLayout, GridLayout, etc.
Here we are using LinearLayout, in LinearLayout views can be either placed in vertical or horizontal format.
So android:orientation="vertical" under LinearLayout defines that the views will be placed vertically.
Next we have used Buttons and TextView, for any view id,width and height are the basic attributes.
Id of the view is further used in java file as a reference to the view defined in xml.
Width and Height defines the width and height of a view.Either you can put width and height in dp for e.g android:width="20dp" or you can use wrap_content,fill_parent or match_parent. fill_parent and match_parent does almost same thing that it will fit the screen and wrap_content means that it will be wrapped in minimum possible space.
Java file: src---your package name
Here as we have to implement click event so we will have to implement OnClickListener and then in onClick method we can add the functionality that will be performed on a click event.
Manifest file: (AndroidManifest.xml)
Whenever a new Activity is created it should be declared in a manifest file.
An Activity should include a name and intent filters,intent filters are basically used to define the role of activity as in our case when our application is launched so the activity that needs to be displayed first should be mentioned as a launcher activity for e.g android:name="android.intent.category.LAUNCHER" under the category.Also the action names can be used to navigate between different activities which we will see in our further tutorials.
So that's it we have created an application having buttons with click events. If you have any doubts feel free to ask me in the comments below.
Output will be as:
Xml file: res---layout
 <LinearLayout xmlns:android="http://schemas.android.com/apk/res/android"
   xmlns:tools="http://schemas.android.com/tools"
   android:layout_width="match_parent"
   android:layout_height="match_parent"
   android:orientation="vertical" >
  <Button
    android:id="@+id/button1"
    android:layout_width="wrap_content"
    android:layout_height="wrap_content"
    android:text="Button 1"
    />
  <Button
    android:id="@+id/button2"
    android:layout_width="wrap_content"
    android:layout_height="wrap_content"
    android:text="Button 2"
    />
  <TextView
    android:id="@+id/textview1"
    android:layout_width="wrap_content"
    android:layout_height="wrap_content"
    android:text=""
    />
 </LinearLayout>
First, Layouts are used to define how your views(i.e Buttons, TextViews, etc) will be positioned on the screen. For these, different layouts are used such as LinearLayout, RelativeLayout, GridLayout, etc.
Here we are using LinearLayout, in LinearLayout views can be either placed in vertical or horizontal format.
So android:orientation="vertical" under LinearLayout defines that the views will be placed vertically.
Next we have used Buttons and TextView, for any view id,width and height are the basic attributes.
Id of the view is further used in java file as a reference to the view defined in xml.
Width and Height defines the width and height of a view.Either you can put width and height in dp for e.g android:width="20dp" or you can use wrap_content,fill_parent or match_parent. fill_parent and match_parent does almost same thing that it will fit the screen and wrap_content means that it will be wrapped in minimum possible space.
Java file: src---your package name
 import android.os.Bundle;
 import android.app.Activity;
 import android.view.Menu;
 import android.view.View;
 import android.view.View.OnClickListener;
 import android.widget.Button;
 import android.widget.TextView;
 public class MainActivity extends Activity implements OnClickListener {
      Button b1,b2;
      TextView tv1;
      @Override
      protected void onCreate(Bundle savedInstanceState) {
           super.onCreate(savedInstanceState);
           setContentView(R.layout.activity_main);
           b1=(Button) findViewById(R.id.button1);//referencing button defined in xml file
           b2=(Button) findViewById(R.id.button2);
           tv1=(TextView) findViewById(R.id.textview1);//referencing textview
           b1.setOnClickListener(this); //setting on click event on button
           b2.setOnClickListener(this);
      }
      @Override
      public boolean onCreateOptionsMenu(Menu menu) {
           // Inflate the menu; this adds items to the action bar if it is present.
           getMenuInflater().inflate(R.menu.main, menu);
           return true;
      }
      @Override
      public void onClick(View v) {
           // TODO Auto-generated method stub
           switch(v.getId()){//v.getId() for getting id of the pressed button
           case R.id.button1:
                //button1 pressed
                tv1.setText("Button 1 pressed");//set text of textview
                break;
           case R.id.button2:
                tv1.setText("Button 2 pressed");
                break;
           }
      }
} Here as we have to implement click event so we will have to implement OnClickListener and then in onClick method we can add the functionality that will be performed on a click event.
Manifest file: (AndroidManifest.xml)
 <?xml version="1.0" encoding="utf-8"?>
 <manifest xmlns:android="http://schemas.android.com/apk/res/android"
   package="com.example.example"
   android:versionCode="1"
   android:versionName="1.0" >
   <uses-sdk
     android:minSdkVersion="8"
     android:targetSdkVersion="17" />
   <application
     android:allowBackup="true"
     android:icon="@drawable/ic_launcher"
     android:label="@string/app_name"
     android:theme="@style/AppTheme" >
     <activity
       android:name="com.example.example.MainActivity"
       android:label="@string/app_name" >
       <intent-filter>
         <action android:name="android.intent.action.MAIN" />
         <category android:name="android.intent.category.LAUNCHER" />
       </intent-filter>
     </activity>
   </application>
 </manifest>
Whenever a new Activity is created it should be declared in a manifest file.
An Activity should include a name and intent filters,intent filters are basically used to define the role of activity as in our case when our application is launched so the activity that needs to be displayed first should be mentioned as a launcher activity for e.g android:name="android.intent.category.LAUNCHER" under the category.Also the action names can be used to navigate between different activities which we will see in our further tutorials.
So that's it we have created an application having buttons with click events. If you have any doubts feel free to ask me in the comments below.